
Build a pickleball court by planning, preparing the base, surfacing, striping, and equipping.
If you want to learn how to build a pickleball court the right way, you’re in the right place. I’ve planned and built courts for homes, schools, and parks. In this guide, I’ll show you how to build a pickleball court step by step, with pro tips, cost ranges, and lessons learned. Let’s make your court play fast, look great, and last for years.

Plan your project
The best courts start with a smart plan. Check zoning, permits, setbacks, and HOA rules. Call 811 to mark utilities before you dig. Set a budget and timeline that match your goals.
Pick a site that drains well and stays dry. Aim the long axis north–south to reduce glare. Think about neighbors and noise. Acoustic panels and windscreens help on tight lots.
If you want a clear path on how to build a pickleball court, define your use. Will you host leagues, or is it for family play? That choice affects size, lights, fencing, and cost.
Key planning checks:
- Space: minimum 30 ft by 60 ft per court, ideal 34 ft by 64 ft.
- Sun and wind: trees can shade, but roots can crack. Plant or remove with care.
- Access: a flat, firm path for materials and future maintenance.
Court dimensions and layout
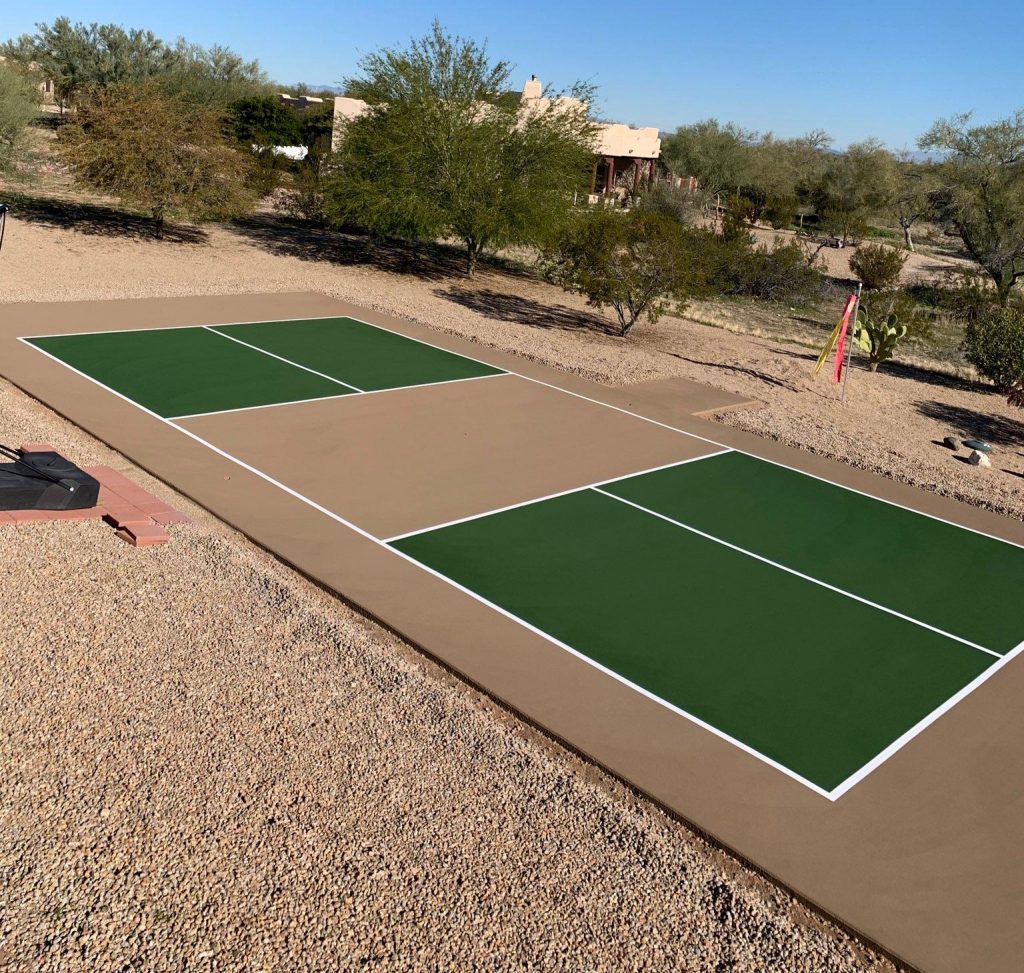
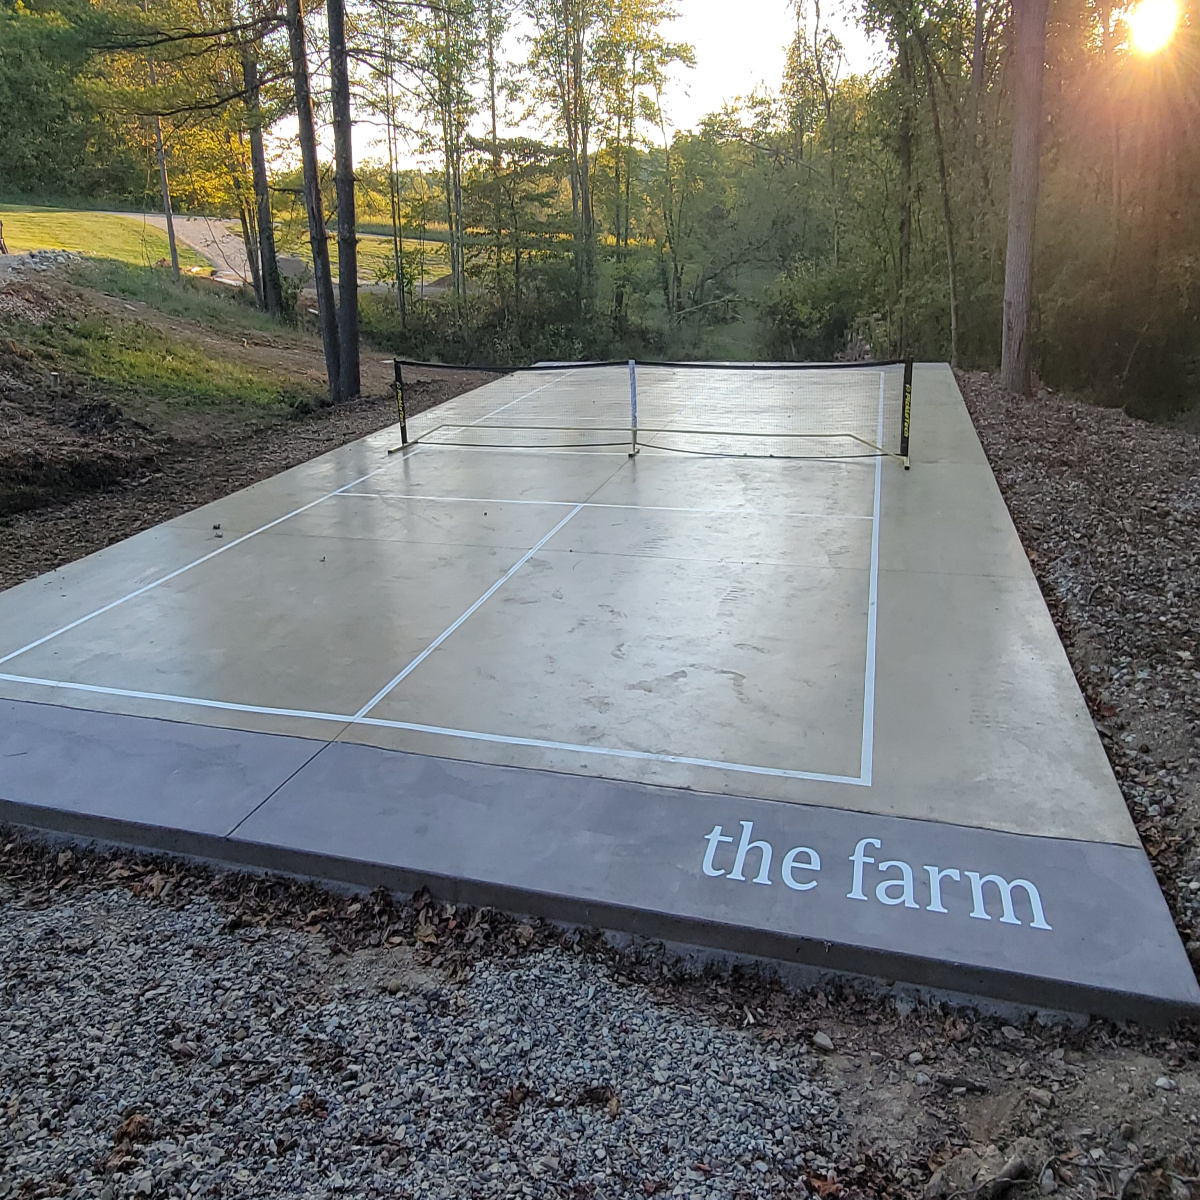
Follow industry standards to avoid costly rework. The playing lines are 20 ft by 44 ft. The non-volley zone (kitchen) is 7 ft from the net on each side. Lines are 2 inches wide. Net height is 36 inches at the sidelines and 34 inches at the center.
For safety, leave runout room. Minimum 5 ft behind baselines and 3 ft on sides. Ideal is 10 ft behind and 5 ft on sides. For multi-court pods, leave 8–10 ft between sidelines.
Layout tips from the field:
- Establish a control baseline with string lines and stakes.
- Use a laser or level to check slope as you layout. Target 1% cross slope for drainage.
- Paint comes last, but layout early to plan space and accessories.
If you’re mapping how to build a pickleball court on your lot, chalk and string are your best friends.

Build a stable base
Great play starts below the surface. A bad base will crack, heave, and pool water. Test soil and remove organic topsoil. Compact to 95% of standard Proctor if you can.
Two proven options:
- Asphalt: 3–4 inches total hot-mix over 4–6 inches of compacted crushed stone.
- Post-tensioned concrete: 4.5–5 inches with cables to control cracking. Higher cost, best longevity.
Step-by-step base process:
- Excavate and grade. Plan for a 1% slope to a drain or daylight.
- Install geotextile on weak soils. Add 4–6 inches of angular stone and compact in lifts.
- Set forms and curbs. Keep edges clean and square.
- Place asphalt or concrete. Check flatness within 1/8 inch in 10 ft.
- Cure. Asphalt needs 14–30 days. Concrete needs 28 days before coatings.
If you study how to build a pickleball court, you’ll see base work is where quality is won.
Choose surfacing and colors
Most outdoor courts use acrylic sport coatings. They add grip, color, and UV protection. They also slow wear and help with ball bounce.
Typical coating system:
- Crack repair and patching as needed.
- Acrylic resurfacer to level micro texture.
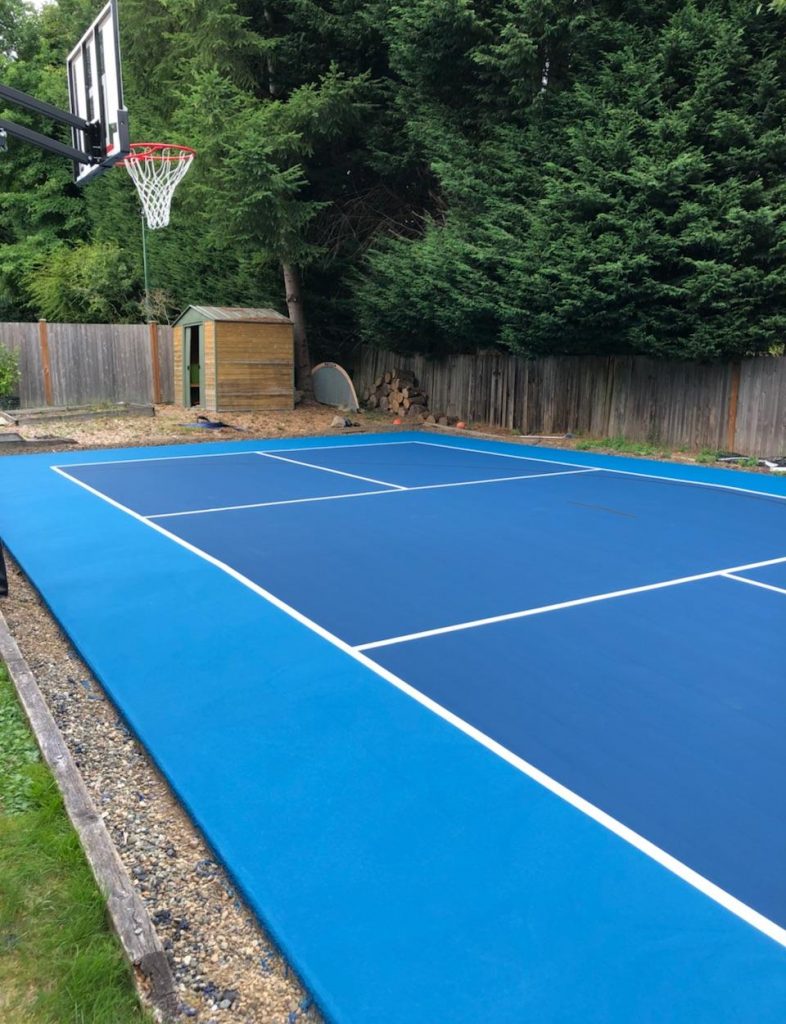
- Two to three color coats in contrasting colors. Many choose blue or green play area with a different color for the kitchen.
Install when temps are 50–90°F and rising. Keep it dry and dust-free. Concrete needs a vapor barrier below or a proper primer above to reduce moisture issues.
If you want a softer feel, add a cushioned system. It adds cost but is easier on joints. Anyone asking how to build a pickleball court that’s gentle on knees should consider this step.

Fencing, windscreens, and gates
Fencing keeps balls in and players safe. For homes, 8 ft high chain-link works. For clubs, 10–12 ft is common. Use black or green vinyl-coated fabric to cut glare.
Good practice:
- Set posts in concrete below frost depth.
- Keep a 1–2 inch gap at the bottom for water flow.
- Use 70–80% windscreens to reduce gusts, but leave corners open to vent.
Gates should be 42–48 inches wide for carts and ADA access. Self-closing hinges and latches add safety. If noise is a concern, acoustic screens can help a lot.
When learning how to build a pickleball court near homes, this step keeps peace with neighbors.

Nets, posts, and anchors
A sturdy net feels great and lasts longer. Use permanent posts in sleeves set in concrete. That lets you remove them for service. Posts sit 22 ft 0 in apart, outside the sidelines.
Net setup checklist:
- Net height is 36 inches at posts and 34 inches at center.
- Use a center strap to hold height all season.
- Choose a heavy-duty net with double mesh at the top.
Portable nets are fine on shared spaces. But for daily play, permanent is best. If you ask how to build a pickleball court that plays true, this detail matters.

Lighting for evening play
LED lights extend play and boost value. Aim for 30–50 foot-candles on the court, uniform and glare-free. Warm-white LEDs (3000–4000K) are friendly to neighbors.
Common layouts:
- Two poles, 18–20 ft high, centered on the sidelines. Budget choice.
- Four poles, 18–20 ft high, one near each corner. Better uniformity.
Run power in conduit below frost depth. Add timers, photocells, and shields to cut spill light. When you plan how to build a pickleball court for night games, design lights early.
Lines and striping
Court lines are 2 inches wide and bright white. Mask with quality tape. Use a textured acrylic line paint for grip and durability.
Striping order that works:
- Double-check measurements before tape goes down.
- Paint baselines, sidelines, and centerline first.
- Paint kitchen lines and service boxes last.
Remove tape while paint is tacky to get crisp edges. If you want to master how to build a pickleball court that looks pro, clean striping seals the deal.

Accessories and amenities
Small touches make play better. Add items that fit your space and budget.
Great add-ons:
- Benches, shade canopies, and a water station
- Paddle racks, ball holders, and a gear box
- Windscreen logos and court number signs
- First-aid kit, AED location sign, and a shoe brush station
- Trash and recycling bins
If you focus on user needs while planning how to build a pickleball court, these details shine.
Budget and cost breakdown
Costs vary by site, region, and scope. Here are ballpark ranges per single court.
Typical ranges:
- Site prep and base: $6,000–$18,000
- Asphalt or concrete slab: $8,000–$25,000
- Acrylic surfacing and striping: $4,000–$9,000
- Fencing and gates: $6,000–$15,000
- Lighting: $7,000–$25,000
- Nets and posts: $500–$1,500
- Accessories: $500–$3,000
DIY projects can start near $8,000–$20,000 without lights. Full pro builds often run $25,000–$60,000 per court. If you’re weighing how to build a pickleball court on a budget, reuse a tennis slab or share fences.
Money savers:
- Build in the off-season when crews are free.
- Use two-pole lighting first, add more later.
- Share fencing between side-by-side courts.
DIY timeline and project plan
A smooth schedule keeps stress low. Weather, crews, and permits will set the pace.
Simple plan:
- Planning and permits: 2–6 weeks
- Site work and base: 1–2 weeks
- Slab placement: 1–2 days
- Cure time: 2–4 weeks
- Surfacing and lines: 3–5 days
- Fencing, lights, and nets: 2–7 days
Build during a dry, mild stretch. Heat and rain slow coatings. If you map how to build a pickleball court with this timeline, you’ll avoid rush mistakes.
Maintenance and care
Protect your investment with light upkeep. Sweep or blow debris weekly. Wash the surface with mild soap each season. Keep drains clear.
Quick care tips:
- Fix small cracks early before water makes them bigger.
- Check net height monthly. Tighten center strap as needed.
- Remove windscreens before big storms if wind load is high.
- Resurface every 4–7 years, depending on sun and use.
People who learn how to build a pickleball court also learn this: small care beats big repairs.
Common mistakes to avoid
I see the same errors over and over. Most are easy to avoid.
Watch out for:
- Poor drainage and flat spots that hold water
- Thin base layers and weak compaction
- Painting too soon before asphalt or concrete cures
- Wrong dimensions or crooked lines
- Harsh lights that blind players and upset neighbors
If you want to master how to build a pickleball court, avoid these traps from day one.
Permits, insurance, and neighbor relations
Talk with your city about setbacks, impervious limits, and lighting rules. Some areas require stormwater plans. Document inspections and keep records.
Be a good neighbor:
- Share your plan and hours of play.
- Add plants, fences, or acoustic screens.
- Use warmer light and shields at night.
Ask your insurer about added liability. Clear rules and signs help. Anyone exploring how to build a pickleball court at home should check these boxes.
Safety and accessibility
A safe court welcomes everyone. Provide a firm, slip-resistant path from parking to the gate. Keep thresholds smooth and wide.
Safety basics:
- Use contrasting colors to define the kitchen.
- Pad hard posts near player areas if space is tight.
- Keep a stocked first-aid kit by the gate and post emergency info.
Make space for chairs and wheelchairs outside the sidelines. If you plan how to build a pickleball court with access in mind, more friends can play.
My field-tested tips from recent builds
A few lessons I share with every client:
- Spend on the base. It’s the difference between five and fifteen years.
- Two-tone color helps players read lines faster.
- A center strap on the net is a small part that solves big sag.
- Add a hose bib near the fence. You’ll use it a lot.
- If trees are close, install root barriers now.
When people ask me how to build a pickleball court that feels pro, I say this: measure twice, slope once, and protect the surface.
Frequently Asked Questions of how to build a pickleball court
What is the official size of a pickleball court?
The playing area is 20 ft by 44 ft. Plan at least 30 ft by 60 ft overall for safety.
How much does it cost to build a court?
DIY builds can start around $8,000–$20,000. Pro courts with lighting often run $25,000–$60,000.
Can I convert a tennis court into pickleball?
Yes. You can paint lines for up to four courts on one tennis court. Add portable nets or install sleeves for permanent posts.
How long does the build take?
Active work is 2–3 weeks. Cure time adds 2–4 weeks, so plan for 4–8 weeks total.
What surface is best for outdoor play?
Acrylic sports coatings over asphalt or post-tensioned concrete are the standard. They give good grip, color, and bounce.
Do I need permits to build?
Often yes. Many cities require permits for slabs, lights, and fences. Check zoning and stormwater rules first.
How high should the net be?
Set 36 inches at the sidelines and 34 inches at center. Use a center strap to hold the height.
Conclusion
You now have a clear, field-tested plan for a court that plays great and lasts. From base prep to final lines, each step has a purpose. Start with a smart site plan, build a solid slab, and finish with quality coatings, fencing, and lights.
If you’re ready, sketch your layout today and call your utility locator. Use this guide to price options, avoid common mistakes, and plan your schedule. Want more tips or a printable checklist? Subscribe for updates or drop your questions in the comments.